Can you rotate video with Lightworks? Yes, several users have reported that when their cell phone videos were rotated either 90-degrees or flipped upside down, they were able to use Lightworks to rotate the video back to its proper orientation.
This article shows you how to rotate video with lightworks, whether it is a YouTube video capture or not, and also the best alternative to Lightworks to rotate video files so they play correctly on any device. Lightworks is the ideal tool used by many top-tier video editing services because it is so versatile and offers tons of tools other than the rotate video function. You can create stunning videos or add some pizzaz to your existing videos using this amazing non-linear video editing platform. Let’s look at a couple of ways to rotate a video with Lightworks.
IMAGE: UNSPLASH
How To Rotate Video With Lightworks
Method 1: Import In A Sequence And Then Export Them
If you have a series of videos, you can put them in a particular sequence and import them into Lightworks. Some users have said that this is the simplest way to correct issues like wrong orientation and other glitches.
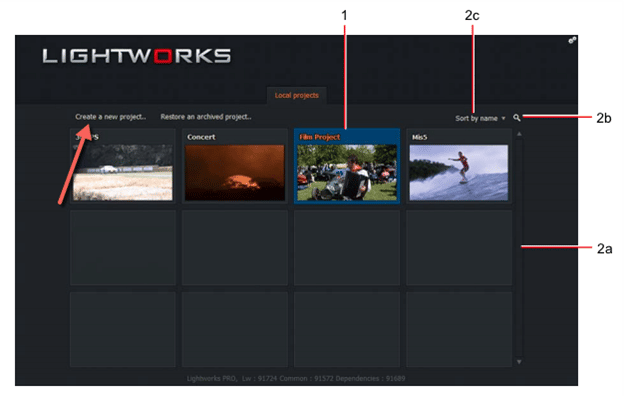
1. Inside Lightworks, create a new project and set the frame rate based on the frame rates the videos were recorded at, and click Create.
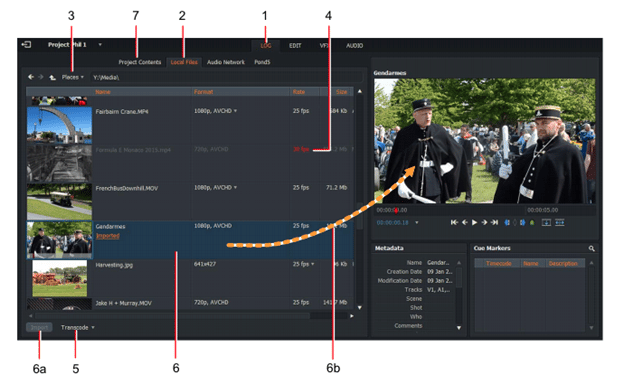
2. Next, click on Places and then go to the location where your videos are saved. For example, your desktop.
3. Select the video files to be imported and click the Import button. You will now be able to see all the videos there.
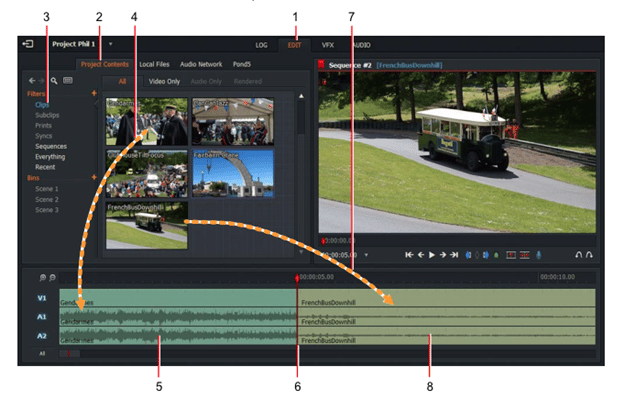
4. To export these videos, go to the Edit tab and put the first video into the timeline. This will be Sequence #1. To create a second one for the next video, right-click an empty spot in the media pane and select Make → Create Empty Sequence.
5. Now, bring the second video into this empty sequence and drag it to the beginning of the timeline.
6. Once you have set up a sequence for each video, select it, right-click the sequence on the left side of the timeline, and select Export. Do this for each of the videos.
When you open the videos in any media player after exporting, you’ll see that they have been rotated correctly.
Method 2: Using The Flip Function Or Rotate Video With Lightworks Manually
This method involves using the Flip function, which flips your video by 180 degrees. If your video is only flipped by 90 degrees, you can manually rotate it. Here’s the process:
1. Follow Steps 1 through 4 from the previous process to import your videos to a new project and then create sequences for each video. If you only need to rotate one, create a project, import the video, and create just one sequence.
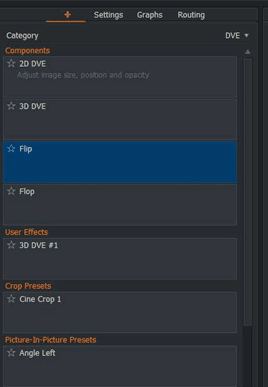
2. Open the sequence in the timeline and go to the VFX tab and click +. Now, look for and click the Flip button below 3D DVE.
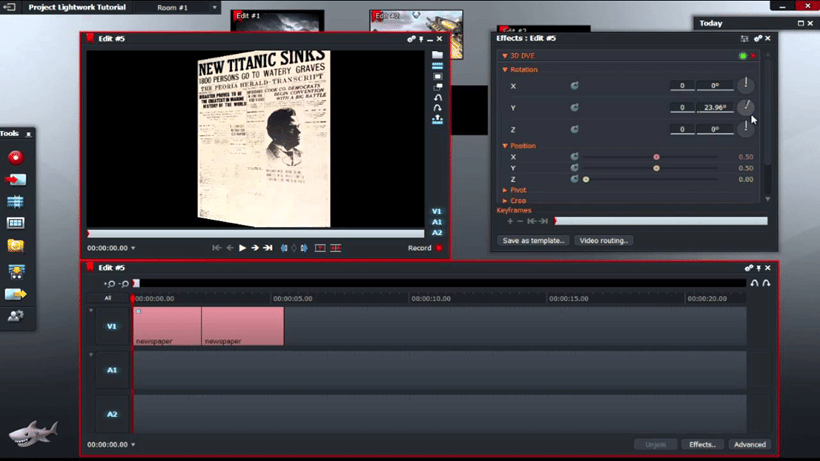
3. If you don’t see Flip or Flop options, use the z-axis rotation function to control the direction you want to rotate the video in and bring it to the correct orientation.
4. Do this for each video and then export the sequences as shown in Step 6 of the previous process.
These two methods will allow you to rotate video with Lightworks and get them in the right orientation, but they do have their limitations as well.
Limitations Of Rotating Video In Lightworks
1. Lightworks Free may not give you the features you need to rotate the video.
2. Export options are limited if you’re on the Free version.
3. If you have a lot of videos that have this problem, you still have to do them one at a time.
4. Bulk export is not available even after spending a lot of time importing and rotating videos one by one.
5. The process itself is a little complex and not suitable for new users.
As you can see, there are several limitations when it comes to rotating video in Lightworks. Using a different video editor like iMyFone Filme will eliminate a lot of these problems. Filme for Mac and Windows is a robust video editing tool that comes with a slew of additional features like transitions, effects, text, video slideshow creation, cropping, speed control, and more.
Best Alternative To Lightworks To Rotate Video In Just 60 Seconds
It’s very easy to import and export videos into and out of iMyFone Filme, which cuts down the time required to rotate video files no matter how many you have in the queue. The steps are shown below for a single video but you can do it for several videos as well.
1. Launch Filme video editor and use the drag-and-drop option to import your video files into the Media section.
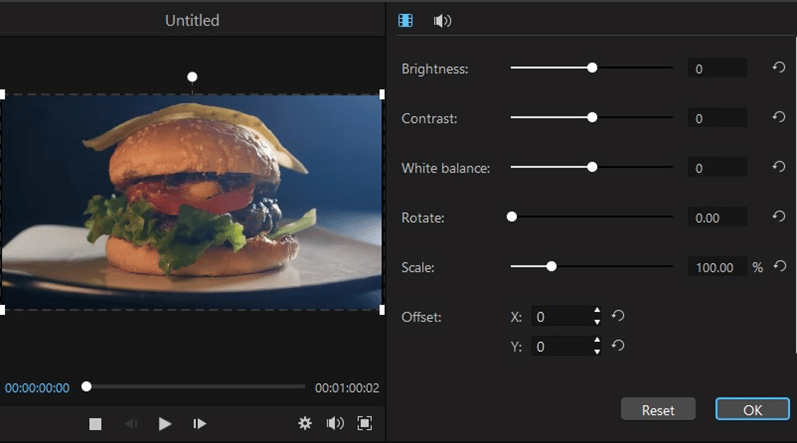
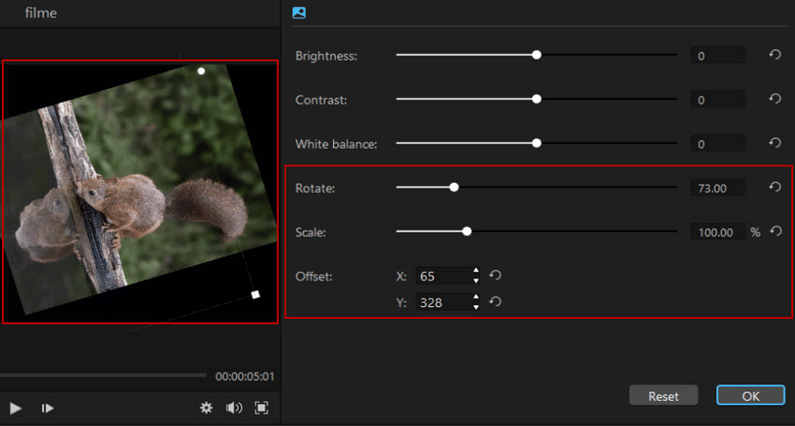
2. To rotate a video, drag a clip to the timeline and double-click to open the video editor on the top right-hand side.
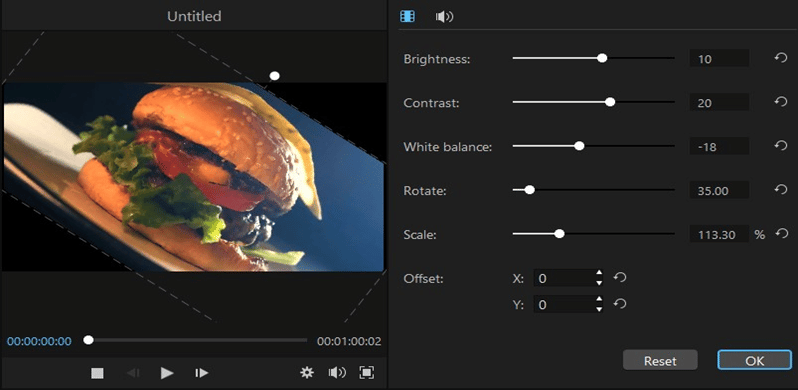
3. In the video editor, use the Rotate slider to rotate the video 90 or 180 degrees. You can also use the Offset options to rotate the video along a particular axis. All of these have ‘undo’ options right next to them so don’t worry if you make a mistake.
4. You can now click OK to confirm the changes and then click Export and choose the format for your output video file before exporting.
That’s how simple it is! As you can see, there’s no lengthy process of creating sequences for multiple videos. If you have more than one, import them as a group and then edit them one at a time to correct the orientation.
Bonus Tip: Rotate An Image With Filme In High Quality
Image manipulations are notorious for losing quality, but Filme allows you to rotate an image as easily as a video and maintain the resolution. Just follow the same steps as for the ‘rotate video’ process, but this time, instead of dragging your video to the timeline, drag the image.
Once you do that, right-click and select edit or just double-click the image in the timeline. The edit options will appear on the top right panel, where you can use the Rotate slider or Offset options. Click OK when you’re done and then export the video in a range of lossless formats as shown in Step 4 of the process above.
Key Features Of Filme
Below are the most important features of iMyFone Filme:
- Comprehensive editing tools, including cropping/trimming, rotating, reverse play, speed control, white balance, contrast, color, orientation, etc.
- Effects such as transitions and animation are constantly being added to the growing library, which you can easily access in the Effects tab on the top left.
- Fast Video Mode allows you to create video slideshows from existing media files such as photos and video clips.
- Audio tracks can be viewed, added, and edited. Filme comes with a robust collection of royalty-free audio that you can use in your videos before posting them to social media sites, websites, blogs, vlogs, etc.
- Drag-and-drop and double-click actions are available for most operations.
- The new version, Filme 3.0 for Windows, offers several new and improved features:
- Refreshed UI that is more intuitive and easier to use if you’re a first-timer.
- More transitions and effects.
- More fast video template and theme options.
- Import media files and folders directly from your smartphone.
- Zoom and pan your videos to highlight a specific area or subject.
- New text effects and font families.
- Direct sharing option for YouTube and Vimeo.
Faqs – Frequently Asked Questions About Rotating Video In Lightworks
Can I Rotate An Upside-down Video To Normal Orientation With Lightworks?
Yes, an upside-down video is nothing more than a video that has been rotated to 180 degrees. Using the methods described above, you can either use the Flip option or manual user effects to bring the orientation back to normal.
Can I Rotate An Image With Lightworks?
Lightworks can only work with video files, so when you import photos, they are imported as still frames rather than images. The problem is that Lightworks doesn’t recognize image metadata that corrects an image when it’s being displayed. However, you can use the same 3D DVE effect to Flip the image or rotate it manually, as shown in the above sections.
How Do I Add A Swing Effect For Certain Video Layers Or Elements With Lightworks?
You can add a swing effect to a video layer in Lightworks using keyframe editing. The process is a little complicated but the gist is that you add a video layer containing text or an image, and then use the keyframe tool to set a rotation over a specific duration. To get the swing effect, you need multiple keyframes where the object or text rotates to the left, then back, then to the right, and back, and so on.
If you are interested in even more app-related articles and information from us here at Bit Rebels, then we have a lot to choose from.

COMMENTS