Most how-to videos start with tools. This one starts with a problem that every growing maker hits: the desk becomes the bottleneck. The consequence is not only cramped hardware, it is lost momentum. The decisive move in this setup was less about buying a particular gadget and more about reorganizing the way work appears, is accessed, and is remembered.
The real significance here is not that a projector can throw a hologram on a wall or that an AI can speak its name. What matters is the way those elements change where ideas sit in relation to hands, eyes, and routine. Making work visible and reachable changes behavior. It moves projects out of hidden drawers and into daily attention.
This article walks through the choices a maker made when upgrading a home lab. It highlights practical swaps that scale with ambition, explains the tech that turns familiar projects into a spatial heads-up display, and surfaces the tradeoffs that determine whether a DIY Smart Lab is empowering or distracting.
What becomes obvious when you look closer is this: good makerspaces are defined by a handful of repeatable decisions, not by an unlimited budget. Those decisions are about ergonomics, modular power, durable lighting, and signal objects that anchor motivation. Where people trip up is thinking that more gear equals more capability. The opposite is often true when the workflow is fragmented or invisible.
Why The Desk Is The Foundation
An adjustable desk is the physical operating system of a maker bench. By shifting posture away from a single fixed height, a desk with presets removes small interruptions that otherwise fracture creative focus and slow progress.
Desks are the physical operating system of any maker environment. When the speaker found their old desk too small, the upgrade that mattered was a standing desk with programmable height presets. A desk that remembers preferred heights removes friction between soldering, coding, and editing, because physical posture no longer interrupts focus.
That specific model, the Flexispot E6, is notable for straightforward assembly and memory presets, but the lesson is general. Investing in an adjustable desk typically falls within a range of a few hundred dollars to mid-hundreds depending on features. The return is in minutes saved every session and fewer interruptions during delicate work.
The moment this foundation shows strain is when the desk no longer accommodates the tools you use most. If 3D printers, a monitor, a soldering station and parts trays fight for the same footprint, the setup becomes a juggling act. Designing for headroom, cable routing, and adjacent shelving keeps workflow continuous.
Must Have Tools And Layout Tricks
Small, cheap changes compound into much smoother sessions. A durable cutting mat, clear tool access, and disciplined cable routing reduce micro-friction that otherwise eats focus.
Cutting Mats, Tool Access, And Layout
Small, cheap changes compound. A cutting mat protects the desk surface, provides a visually stable work plane, and prevents parts from rolling away. Grid lines do more than measure, they speed up repeated tasks like trimming PCBs or aligning parts for assembly. In other words, small tools erase micro-friction from creative flow.
Power, Cable Management, And Reach
Mounting an extension cord or power strip on the desk edge is an underappreciated productivity hack. It stops the need to crawl under the desk, reduces wear on plugs, and lets devices remain powered during swaps. Power strips with surge protection typically cost under $50, while more sophisticated modular power rails run higher; the right choice depends on how many active devices you plan to run.
What determines whether this works is discipline. Habits around plugging, labeling, and storing cables prevent the strip from becoming a tangle. Plan for 20 to 40 percent more ports than you think you need, because makerspace growth is inevitable.
Lighting And Ergonomics
Task lighting is a functional safety and quality control decision. Proper illumination reduces eye strain, improves soldering precision, and speeds component recognition during inspection and assembly.
Good lighting is not optional. Fine electronics work and soldering require a stable, bright field. The speaker upgraded to a machine light from jlcmc and recommends something stronger than a standard desk lamp. Task lights for electronics typically deliver hundreds to thousands of lux at the work surface and cost from under $50 to a few hundred dollars depending on delivery and color accuracy.
Lighting is also an ergonomic feature. Proper illumination reduces eye strain, speeds component recognition, and improves soldering precision. The tradeoff is that intense lighting can show dust and imperfections, which is useful for quality but less forgiving for casual hobby work.
Motivation, Display, And Personal Anchors
Keeping finished projects in view turns them into motivational fixtures that nudge the brain to return. Visual anchors change the emotional pull of a workspace and alter how often projects get iterated.
One of the more interesting editorial signals in this build is the decision to treat the desk as both a toolbench and a museum case. The maker keeps tangible motivators visible: a replica arc reactor that recalls early inspiration, and the Flex Hand robotic project which demonstrates capability. These objects serve as behavioral anchors that encourage return visits and longer focus sessions.
What often goes unmentioned is the measurable effect of visible success. Keeping a finished project in sight increases the probability of follow-up by a noticeable margin. In practical terms this means projects move from concept to iteration more quickly because they remain salient.
Jarvis, The Holographic Heads Up Display, And Hand Tracking
The HUD reframes ambient information as part of the work environment rather than a separate screen. That shift changes how tasks are started, resumed, and remembered across sessions.
How The HUD Reframes Work
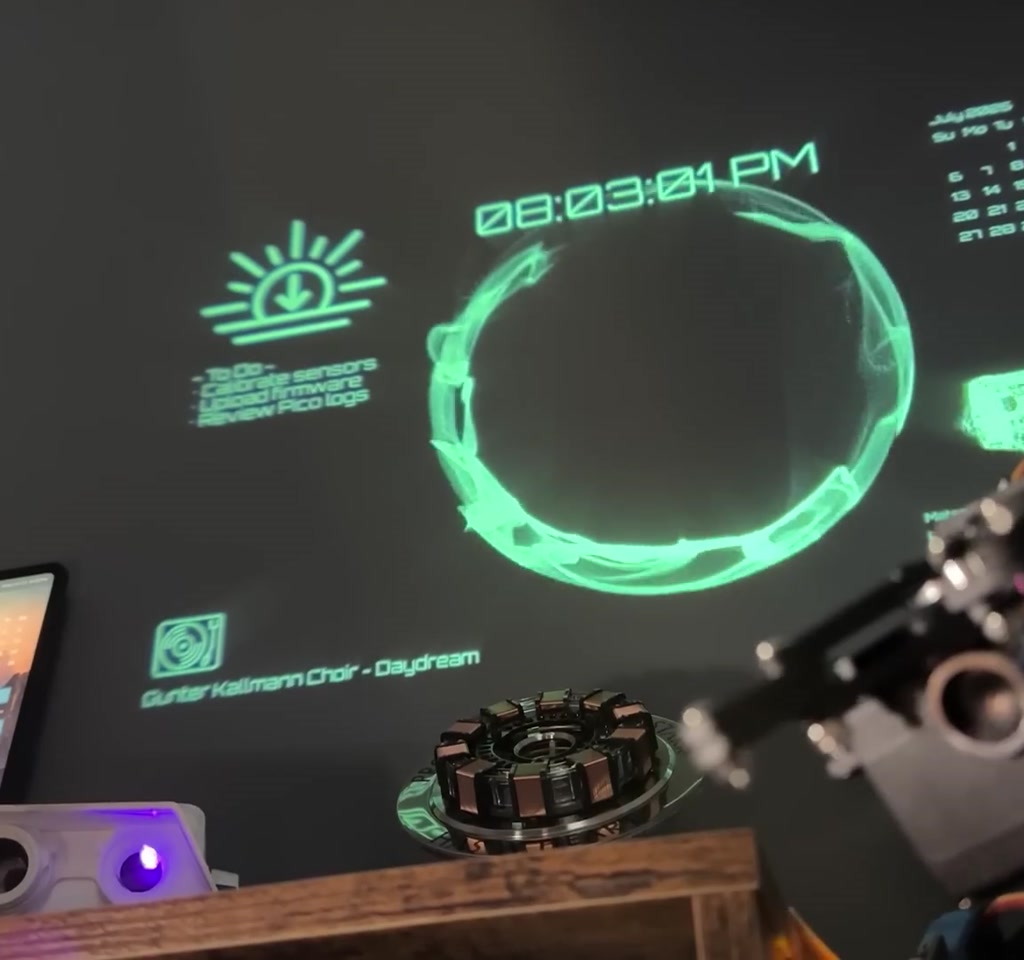
The speaker created a personalized assistant named Jarvis, combining local display hardware with AI-driven features. A short-throw projector turns the wall into a heads-up display that shows music, time, a to-do list, and live holographic animations of past projects. The effect is to move actionable information into peripheral vision, which changes how tasks are started and resumed.
Turning old projects into simple holographic animations is both playful and practical. Motion and scale make projects read as objects rather than files. This is the case where interface design meets craft. The HUD functions as an ambient project board that rewards glances and hand gestures.
Hand Tracking And Interaction Boundaries
Hand tracking promises controller-free interaction, but the reality is conditional. Camera-based systems map gestures into the projected scene well in controlled light and angles, yet they remain sensitive to occlusion and latency.
Hand tracking, borrowed from the Flex Hand project, allows the maker to reach out and grab holograms. Technically this integrates camera-based tracking with gesture recognition and mapping to the projected scene. The promise is intuitive interaction without physical controllers, but the threshold for reliable performance depends on lighting, camera angle, and compute responsiveness.
The tradeoff here is latency versus convenience. Camera-based hand tracking can feel immediate in ideal conditions, but it will degrade in low light or when the camera view is partially occluded. Expect iteration. Initial setups often require tens to a few hundred calibration cycles to feel natural.
Short-Throw Projector Vs Traditional Projector: Brightness, Latency, And Use Case
Choosing a projector is a practical tradeoff between space, brightness, and optical placement. Short-throw models reduce shadowing and fit small rooms; traditional projectors can offer higher brightness but need more distance and different mounting solutions.
Short-throw projectors are favored in this build because they can project large images from near the wall, minimizing physical disruption to the desktop. Traditional projectors may provide higher lumen counts for bright rooms but require more careful placement and often a dedicated ceiling mount.
Open Source, Community, And Distribution
Sharing code and workflows accelerates adoption and spawns useful forks. Open source makes the HUD replicable on modest budgets and invites community solutions to reliability problems.
Crucially, the HUD code is open source and shared on Ark, a social network for inventors. Sharing the code lowers the barrier for other makers to replicate or remix the system. The maker also invites collaboration via email and a Discord server for the Mateo Tech Lab community, which turns a solitary bench into a node in a distributed workshop.
From an editorial standpoint, the open source choice is the multiplier. Hardware can be reproduced with modest budgets, but software sharing accelerates learning curves and produces forks that solve edge case problems faster than a single creator could alone.
Constraints, Tradeoffs, And Practical Limits
Every benefit carries a cost. Budget, power, maintenance, and time shape whether a DIY Smart Lab is sustainable in the long term.
No makerspace is universally ideal. There are hard constraints that define usefulness. First, budget. The desk, a modular power strip, a reliable task light, a soldering station, and modest 3D printing hardware can realistically be assembled for a few hundred to a couple thousand dollars. For example, stand-up desks with memory presets typically cost in the low hundreds to mid hundreds, task lighting varies from under $50 to a few hundred, and short-throw projectors often range from a few hundred to over $1,000 depending on brightness and optics.
Second, power and environmental limits. Running a short-throw projector alongside printers, a laptop, and lighting will increase power draw. Projector power consumption typically ranges from about 20 watts for small LED models to over 200 watts for lamp-based units. That matters in apartments where circuit capacity is shared. Planning for 100 to 300 watts of peak draw for a small makerspace is prudent.
Third, maintenance and reliability. 3D printers and soldering gear work well for months, but maintenance tends to surface after dozens to hundreds of print hours. Parts like nozzles, belts, and build surfaces wear out and need replacement. Expect periodic parts costs that add up over time, often measured in tens to low hundreds of dollars annually if devices are used weekly.
Fourth, time and learning curves. Building an AI-enabled HUD with gesture control requires software iteration. Local hand tracking and AI integration have two cost components. One is development time, often dozens of hours for initial functionality. The other is computing resources.
Cloud-based language and vision models can be affordable at hobby scale, measured in dollars to tens of dollars per month, but costs scale toward hundreds if inference is continuous or multimedia-rich. If privacy or offline operation is required, expect the need for a mid-range GPU or an edge compute solution, which is a capital expense in the hundreds to low thousands.
Practical Checklist For Building Your Own DIY Smart Lab
A concise checklist closes the gap between inspiration and action. These items prevent common friction points and make the build repeatable across budgets.
- Choose an adjustable desk with memory presets to remove posture friction.
- Install a durable task light rated for close work, target a light that provides consistent lux and color temperature.
- Mount power within arm reach and add 20 to 40 percent extra capacity for future devices.
- Reserve shelf space for printers and modular storage for parts trays.
- Keep one display project visible as a motivation anchor, and one ongoing project in active rotation.
- If building a HUD, prototype with a short-throw projector and camera, then iterate on tracking and latency.
What Makes This Setup Stick
The setup succeeds when attention is architected. Reduce friction at power access, work plane clarity, and project salience and you convert sporadic tinkering into regular practice.
The simple secret is attention architecture. The maker deliberately reduces friction at three points: access to power, clarity of the work plane, and salience of projects. Those reductions transform sporadic tinkering into consistent practice. People underestimate how much of crafting is about the environment nudging habit.
Quotation worth keeping: “When your space reflects who you are, working here does not just feel productive, it feels like home.” That line distills the behavioral design at play. The space is both instrument and mirror. It must be useful and emotionally resonant to sustain repeat engagement.
From a Bit Rebels perspective, this build matters because it scales. These are choices that work whether someone is starting with a soldering iron and a budget of a few hundred dollars or scaling toward more ambitious, AI-augmented displays. The variables to watch are power, space, maintenance cadence, and the human cost of context switching.
Who This Is For And Who This Is Not For
Who This Is For: Makers who want to reduce friction, iterate faster, and treat a home bench as both a work surface and an information surface. Ideal users value visible success, modular growth, and are willing to invest time in tuning lighting and tracking.
Who This Is Not For: Those who need guaranteed out-of-the-box reliability without iteration, people constrained by strict building or power rules, or hobbyists who prefer low-commitment, purely handheld projects with no ongoing maintenance obligations.
FAQ
What Is A DIY Smart Lab?
A DIY Smart Lab is a compact home makerspace that combines ergonomic furniture, durable task lighting, modular power, and optionally a holographic heads-up display to make projects visible, reachable, and easy to resume.
How Does A Holographic HUD Work In This Setup?
In this build, a short-throw projector displays animated project visuals on a wall while a camera and gesture software map hand movements to those holograms. The HUD surfaces timers, music, and project summaries in peripheral vision.
Is Hand Tracking Reliable For Everyday Use?
Hand tracking can feel intuitive in good lighting and with clear camera angles, but reliability drops with occlusion, low light, or latency. Expect calibration and iterative tuning before it becomes seamless.
What Are The Main Power Considerations For A Home Makerspace?
Plan for peak draws of 100 to 300 watts for a small setup. Projector and printer types vary widely; small LED projectors draw tens of watts while lamp-based models and multiple printers add substantially more load. Check apartment circuit limits before expanding.
Can I Build This On A Small Budget?
Yes. Core functionality begins with an adjustable desk, reliable task light, power strip, soldering station, and an entry-level 3D printer. A basic HUD prototype can be done with an affordable short-throw projector and open source code, though polish requires more time or budget.
Where Is The HUD Code Shared?
The maker shares HUD code on Ark, an inventor-focused social network, and invites collaboration via email and a Discord server for the Mateo Tech Lab community.
Do I Need Cloud AI To Run Jarvis?
Cloud AI can simplify development and reduce local compute requirements, but it increases ongoing costs and introduces privacy considerations. Offline or local operation requires more powerful edge compute, which raises upfront expense.
How Much Maintenance Should I Expect For Printers And Tools?
Expect periodic maintenance after dozens to hundreds of print hours. Replaceable parts like nozzles and belts add tens to low hundreds of dollars annually if used regularly. Regular calibration keeps prints reliable.
COMMENTS