Converting a bootable pen drive to a normal one allows you to remove its bootable properties and restore the drive to its full storage capacity. It allows you to use your converted pen drive as a regular file storage.
It is important to carefully apply the methods for conversion of your bootable pen drive in order to avoid issues like data loss on it. This guide provides you with step-by-step instructions to help you know how to convert a bootable pen drive to a normal one. Check and try these methods!
IMAGE: UNSPLASH
Why Convert A Bootable Pen Drive To A Normal One?
Converting a bootable pen drive to a normal one is helpful in multiple ways; some of which are as follows:
- Reclaim Full Storage Space: Some storage space on bootable drives is allocated for boot files, reducing the available storage for regular use. After converting it to a normal drive, you regain the full capacity of the pen drive for storing other files and data.
- Flexibility: A normal pen drive can be used across various devices, including computers, smart TVs, and media players, without any boot-related restrictions.
- Prevention of Accidental Boots: Converting the bootable pen drive can sometimes cause a computer to attempt to boot from them if they are plugged in during startup. Converting it to a normal drive eliminates this risk, ensuring a smooth and expected boot process.
- Read/Write Operations: It is easy to perform read and write operations on normal pen drives in comparison to bootable drives, which might have certain limitations or restrictions due to their boot configuration.
How Do I Convert The Bootable Pen Drive To Normal On Windows?
Once your purpose of bootable pen drive is achieved, you may want to restore it to a normal pen drive so you can use it as a storage device. In this part of the blog, we’ve outlined some commonly used methods to convert a bootable USB to normal on Windows. Choose the one that best fits your requirements:
Method 01: Use Windows Disk Management
Windows in-built Disk Management utility allows you to manage disk partitions and formats. You can even use it to convert a bootable pen drive to a normal one. All you have to do is:
- Press the Windows + R keys to launch the Run Type diskmgmt.msc in the Run prompt and press the Enter key to launch the Disk Management window.
- Now, locate the bootable USB drive in the Disk Management window, right-click on it and select the “Format…” option.
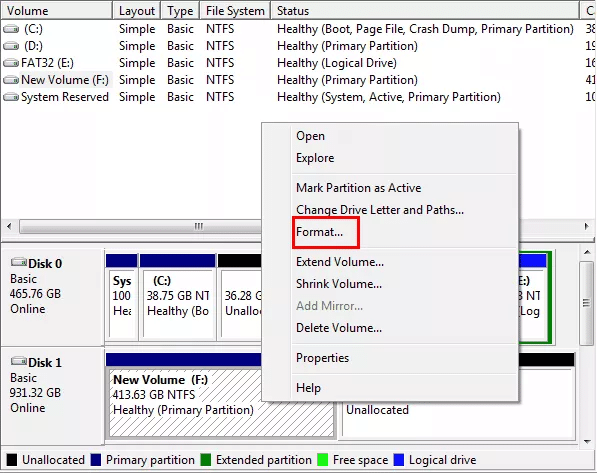
- Lastly, choose the correct file system and choose the “Default” option to allocate unit size. Press OK to conclude the process.
Note: This method will erase all data on the pen drive, so ensure you back up any important files before proceeding.
Method 02: Convert Bootable USB To Normal Using Diskpart CMD
Diskpart is another powerful command-line tool in Windows that allows you to manage disks, partitions, and volumes. To convert a bootable pen drive to a normal one, you need to:
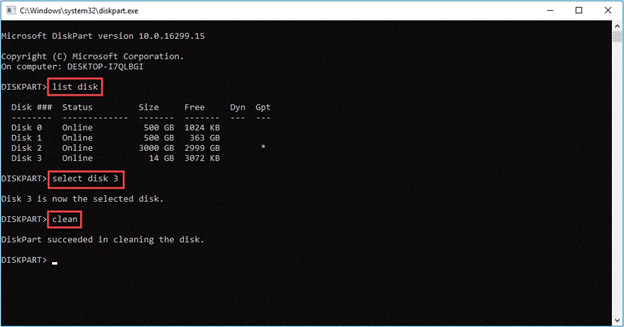
- Firstly, connect your pen drive to the Windows computer.
- Press the Windows + R keys to open the Run window, type Diskpart and press the Enter key.
- Now, type the command: list disk and press the Enter key.
- Then, type “select disk X” (replace X with the disk number of your bootable USB drive).
- Type Clean and press the Enter key to delete all your BIOS boot files from that pen drive.
- After that, type “create partition primary” and press Enter key to create a partition on this bootable USB drive.
- Next, type “format fs=fat32 quick” or “format fs=ntfs quick” (depending on your preferred file system) and press the Enter
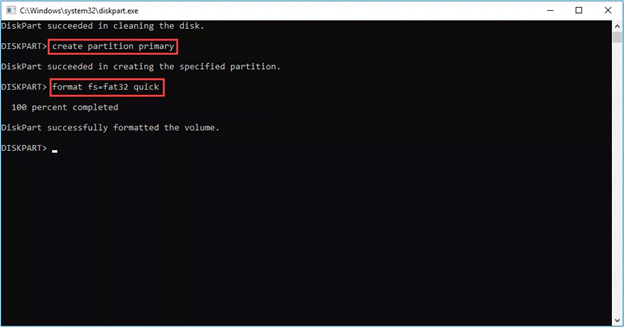
After successfully completing all the steps, type “Exit” and press the Enter key to conclude.
What If Data Loss Occurs On Windows PC During USB Conversion?
Instances may occur when you lose important files on your Windows devices while converting a bootable pen drive to a normal one. In such cases, you can use a professional data recovery software like Stellar Data Recovery Professional to restore those deleted files and folders with ease. This all-in-one data recovery software supports easy and quick recovery of files deleted due to accidental deletion, formatting, disk damage, virus attacks, and many more.
The Stellar Data Recovery Professional software can easily recover files deleted from any internal or external storage drive, such as SSDs, Hard Drives, Pen Drives, and more. Whether you lose your important photos, videos, documents or any other type of file, this professional software allows you to recover them in a few simple clicks. All you have to do is:
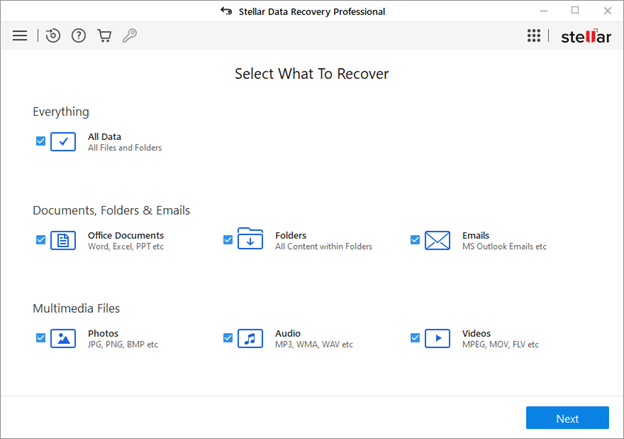
Step 1: Get the Stellar Data Recovery Professional software downloaded and installed on your Windows device. Launch the software and from the homepage, select the type of data you need to restore and click Next.
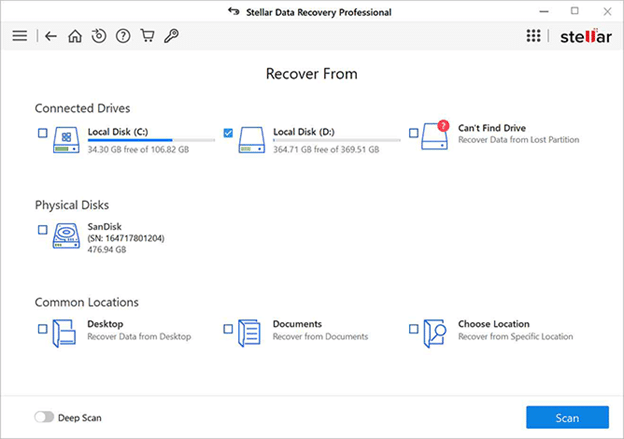
Step 2: Now, choose your faulty storage drive where that data was stored before deletion and click Scan.
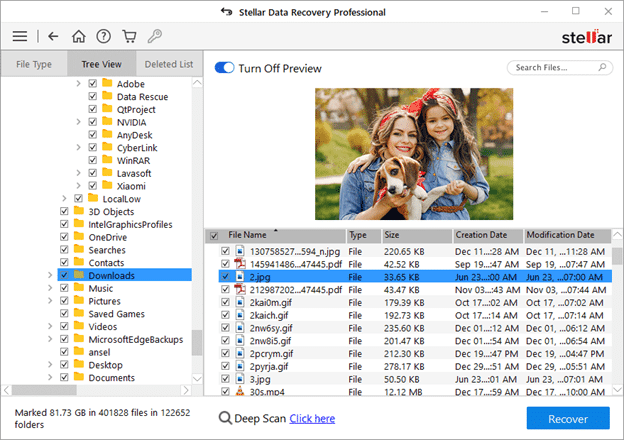
Step 3: After completion of the scanning process, preview the recoverable files and click the Recover button to save recovered data at the desired location.
That’s it! Once the above steps are completed, check if your recovered data is present at the storage location where you’ve saved it.
Preventive Tips to Consider While Converting Bootable Pen Drive to a Normal One
Here are some additional tips that you can consider to conduct a smooth conversion process:
- Backup Data: Always back up any important data before formatting or erasing your pen drive.
- Verify Disk Selection: Ensure you have selected the correct disk before performing any operations, especially when using command-line tools like Diskpart.
- Use Reliable Software: If you are using any third-party software to convert your bootable pen drive or even to recover data lost during the conversion process, use reputable programs to avoid potential issues or data loss.
Conclusion
Converting a bootable pen drive to a normal one might seem complex, but with the above-mentioned methods, you must have learnt how to convert a bootable pen drive to a normal one easily. Whether you are using built-in Windows tools, command-line utilities, or any third-party software, the steps outlined in this guide will help you restore your pen drive to its full capacity, ready for regular use.
Moreover, by following the aforementioned preventive measures and taking the necessary precautions, you can make the process of converting your bootable pen drive back to a normal one quite easy and simple.

COMMENTS