There are a lot of advantages to online learning, and many of us are enjoying the benefits. However, it’s easy to underestimate just how much work goes into creating a successful eLearning course.
Not only does your course need to be informative, but it also has to be intuitive, engaging, functional, and, in some cases, interactable. Instead of diving headfirst into creating your course, first, take the time to develop a substantial eLearning storyboard.

IMAGE: UNSPLASH
What Is A Storyboard And Why Should I Use One?
Once reserved for the movie, animation, and television scene mapping, storyboards have proven incredibly useful for planning online courses. Essentially, an eLearning storyboard serves as a blueprint for your final product, designed to provide you with a screen-by-screen outline of the content, audio, graphics, and interactable elements that make up your course.
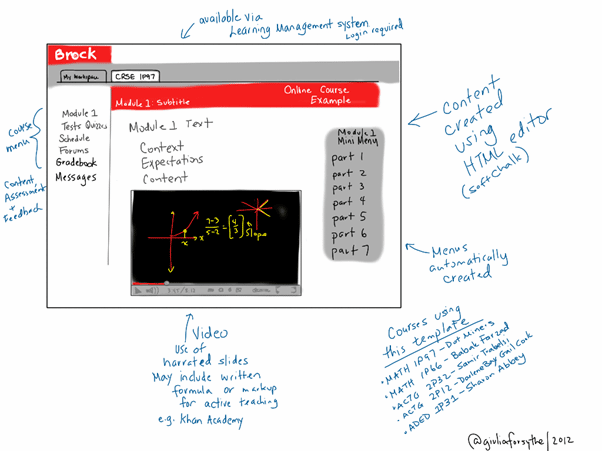
“Brock Online Course Example: Watch, read, try and test” by Giulia Forsythe is licensed with CC0 1.0
Here’s why you should use storyboarding as a planning tool for eLearning courses:
- It speeds up the creation process
- Storyboarding enriches your visualization of the final product
- Having a predetermined structure breeds team collaboration
- It highlights constraints and impracticalities long before the QA testing process
- Storyboarding is time-saving
There are a host of other benefits too, particularly when it comes to stress management and workplace productivity. So, here are some top tips for creating a substantial – and successful – eLearning storyboard.
1. Chose An Authoring Tool And Design Template
The authoring tool you use will depend on the kind of eLearning course that you are planning to deliver. For example, if you were creating a high-density text-based course, you might choose to storyboard on Microsoft Word.
And for the course, there are plenty of alternative storyboarding authoring tools to chose from.
Once you’ve picked an authoring tool, select a design template that fits your course’s aesthetic. There are plenty of ready-made templates that you can download free of charge, but don’t be afraid to get creative and make your own.
2. Include Essential Storyboard Components
Regardless of your design template or authoring tool, there are several main components that are essential to any substantial storyboard. Let’s take a look.
Screen/slide naming convention – each slide should have its own unique name relating to its content and where it fits in the sequencing of your course. For example, you might name a slide [onboarding storyboard_module 1_section 2_topic 3], shortening it to [OB_M1_S1_T3].
Not only will this avoid any potential data loss, but it keeps your projects consistent and your team much more organized.
Screen/slide titles and numbers – adding a title to your slides – such as [Module 2 Recap] or [Activity 1] will help massively with your organization efforts.
Written and graphical descriptions – include the exact wording of any text that you want to be included on each slide, along with requirements like font size and placement. For your animations/images, you might want to accompany written descriptions with placeholders, thumbnails, or mock-ups.
Navigation – even if your course follows a linear path, be sure to indicate to your developers where the user will end up after clicking an element on the screen. This could be using “next slide”, “previous slide” or “start activity” buttons.
Branching – if your course involves interactable activities like quizzes or games, your navigation might be more complex. For example, your user might have multiple navigation options on one screen, with each button taking them to a different page. You want to make sure that your developer is aware of the destination of each trigger, particularly if there’s no obvious label.
Audio and transcription – training videos, recorded video call meetings, and courses with voiceovers will require scripts. Make a note of the narration that goes along with each slide and consider incorporating closed captioning transcription.
Developer notes – reserve this section for anything else that the developer needs to know.
3. Remain Focused On Your Learning Objectives
Your learning objectives are the backbone of your storyboard. They identify the specifics of what you want your students to learn and enable you to create the appropriate informational content around it.
Without learning objectives, it’s easy to overload your storyboard with too much information – or, even worse, fail to provide enough substance. So, identify your learning objectives by asking yourself exactly what you want your users to learn from your course. From there, you can create content that serves this purpose in the best way.
Separate your content into topics or modules, communicate information clearly and focus on key points that relate to your objectives.
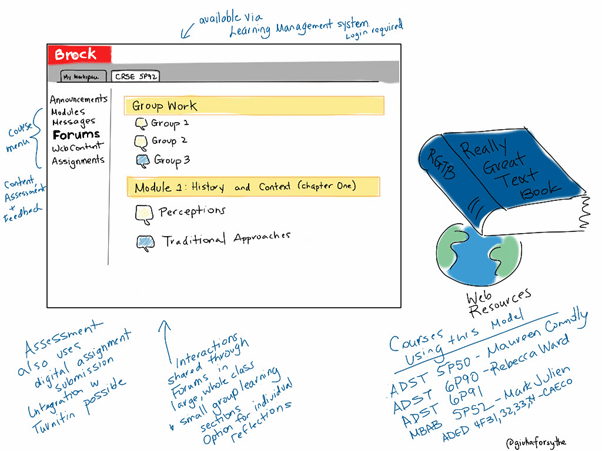
“Brock Online Course Example: Read and discuss” by Giulia.Forsythe is licensed with CC0 1.0.
4. Organize And Sequence Your Content
As you add content to your storyboard, you should always be aware of the logical order that your course will take and organize it as you go.
Start by dividing your content into categories and topics. Identify the most basic concepts and put them at the beginning of your course. Gradually introduce more complex ideas as you go, keeping an eye out for any bits of information that don’t make sense unless you’ve explained a prior idea.
Breaking up your content into sections or modules is one of the best ways for your audience to gradually assimilate information, especially if your eLearning course grows progressively more complex. Your storyboard is the perfect place to optimize your sequence for maximum learner success.
Takeaways
Storyboarding is a great way to plan and assess multiple aspects of your eLearning course, from the quality and logical positioning of your learning material to how attractive and engaging your course will be for your users.
That being said, a lot goes into creating a storyboard. Here are the key takeaways:
- Use the right tools and templates – establish the instructional design of your course and chose the right tools for the job.
- Don’t forget the main components – big or small, every component plays an important role in the effectiveness of your storyboard.
- Stay focused on your learning objectives – try to relate every slide to a learning objective and ensure that your storyboard remains audience-focused.
- Be as illustrative as you can – whether it’s using words or graphics, be descriptive and include every little detail.
- Ask for advice and feedback – whether you are an instructional designer or training manager, your storyboarding process will be more successful if it’s one of collaboration and reviewed by your team. You could even use a video conferencing app with your team and colleagues to achieve this goal and focus on improvement.
With these top tips, you should be on your way to creating a substantial and effective eLearning storyboard. Good luck.

COMMENTS