If you need to create a certain Android app fast and with minimum effort, there are two ways. The first is to contact professionals; expensive, long, and for many a situation overkill. The second is to make this app yourself with Shoutem or https://flipabit.dev/create/, two app builders that have everything you may need.

IMAGE: UNSPLASH
What Does An App Builder Do?
Imagine you need to make an Android app real fast. It does not mean anything revolutionary. It can be a corporate calendar, a messenger, a catalog or store page, a weather app – whatever. For some reason, you don’t want to use a commercially available app and need your own.
But it takes coding knowledge, doesn’t it? It would. With Flipabit, though, the requirements are much lower. All you need to know is a little bit of HTML and a little bit of SQL, but you can, in fact, learn them while making your app. It’s almost as easy as formatting your blog post manually with HTML tags. And, yes, you need the content this app will provide and clear understanding of its future design. The low-level work, in the meantime, is completely automated.
Indeed, it’s like building music of premade loops, adding some vocals and instruments above. With Flipabit, widgets are the loops, and the content you fill them with is the vocal (and so on). You can also compare it to creating a web page in a visual editor like Dreamweaver. The closest, though, is making your own game in Roblox.
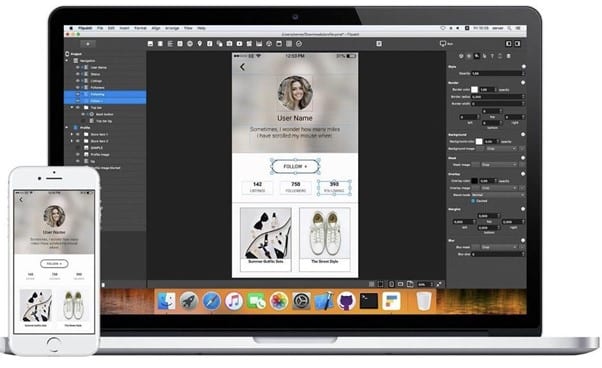
What Does App Building With Flipabit Look Like?
The idea of an app builder is to make the process as visual as it can be. As you download the application to your PC or Mac, you see the screen of a generic mobile device (Flipabit follows the Responsive UI approach that grants your app will look great on any mobile device, regardless of its screen size and resolution). Then you just drag, drop, and resize elements to position them as you like.
Any widget you add can display a text, an image, a video, an interactive button, or data fetched from a remote database (that’s where you will need SQL skills). You can format text and images the way you like: change their position, size, font, frames, colors, etc. Flipabit also lets you add static or dynamic backgrounds that may depend on data fetched with other widgets.
You can also add animations and sounds to your apps, and they may look fantastic. Interactive elements can be added, and widgets may be grouped to provide partial scrolling of the UI. Finally, you can use push notifications if you connect your app to, say, Google Push Notifications APIs.
Last but not least: Flipabit is compatible with Sketch. This means you can export your Sketch projects to Flipabit. If you want, you can select image and symbol export format, but most users are good with the defaults.
What Kinds Of Apps Can You Make With Flipabit?
Not any of them, of course. The idea of app builder applies some limits on the possibilities, as the number of code elements preinstalled is limited as well. But there are certain app types that you can make:
- Guides and glossaries. Necessary if you manage a big project with multiple writers involved, and you need to provide them with a glossary to avoid confusion.
- Hard to overrate for project management as well.
- Store apps. If you run an independent store, you cannot just connect a generic ecommerce app, so you need your own, and Flipabit is a good solution.
- Interactive models and illustrations. On the Flipabit site, you can even see the virtual 3D model of a human body. This anatomy figure is possible to make, unbelievable as it is.
- Positioning articles and illustrations on the page is easy, and you can dynamically change them just by uploading new ones to your cloud, from where the app fetches them.
- The platform supports sophisticated 3D models with interactive elements, so you can create a map of a real object (like a mall or a parking lot) or of an imaginary one.
Can You Publish An App With Flipabit?
If you plan to make your app available to the public, you can do this with Flipabit as well. On Android, you don’t even have to purchase an Android Developer Account. You can just compile your app as an .APK file and upload it to an independent cloud resource. Then Android users can just download it and install it like a regular third-party app.
If you still want it available on Google Play, though, you can connect your ADA or create one with Flipabit. Of course, it needs to be paid separately. Let’s face the truth: chances are you won’t make an app the audience will readily pay for. But if you’re on Flipabit, your purpose is probably different. You need a corporate app to organize your staff and stuff, you want a dedicated app for your online store, or you decide to start a magazine on a very specialized topic.
So what’s the sense of publishing it on Google Play if not for earning a wide audience? First of all, to make your app available to anyone with a Google account, to save fiddling around. Sticking to the standard procedure can save lots of time and effort. In addition, it contributes to your public image.
Come On And Make Your App
Let’s emphasize one thing again. Flipabit does not have a “Make an App” button. It enables you to easier fulfill your ideas, but you remain the creative force of your project. You invent the design and create the layout, you connect your app to data sources and teach it to notify its users, and so on. Flipabit just saves your time by enabling you to do it without delving into coding.
Have you found it useful? Or maybe you have already tried Flipabit or similar services? Did they empower you to do everything you want? What do they lack? Do apps made with it satisfy your needs? If you have anything to add to it, welcome to the comments. We’re always glad to read from you.
If you are interested in even more app-related articles and information from us here at Bit Rebels, then we have a lot to choose from.
COMMENTS