You can have a home theater that is set up with the state-of-the-art sound, but if the quality of your picture does not meet or exceed that of your sound, your home theater is not going to be that impressive. This is especially true if you have a projector at the center of your home theater.
There are several tweaks that you can make to improve the image quality of your projector. Keep in mind that if you are trying to maximize output using a cheap projector, there are not going to be many settings that you can adjust, so you will not have that many options.
That’s why we don’t recommend products in the 100 dollar range. All you get with that is basically a stand-alone unit. Outdoor Movie HQ recommends projectors that are around or under the 200 dollar range as the sweet spot for both quality and price. Of course, you can splurge and go for a high-end unit, as well.
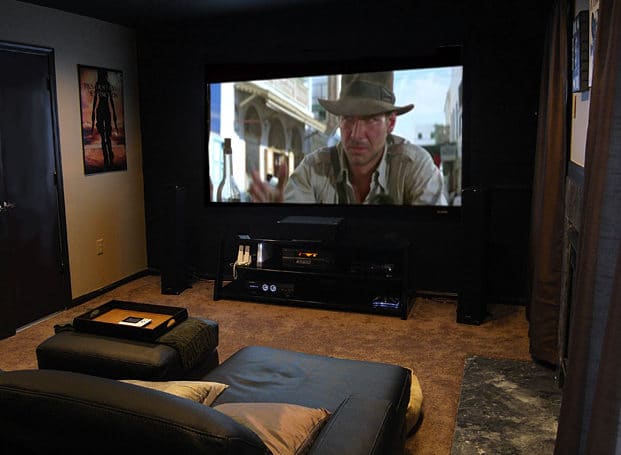
IMAGE: PIXABAY
Improve Picture Contrast, Blackness, And Brightness
When we are talking about black on a projector, we are talking about the lack of light. When we are talking about brightness, we are talking about maximum light output. The first step is to figure out what type of lighting you’re going to have in the room.
If you’re going to use the projector in a completely dark room, then you want to adjust the contrast, blackness, and brightness in that atmosphere. If you are going to have ambient light, then make adjustments in that setting.
These calibrations should be done in cinema or movie mode. You want to find a scene that has plenty of black, such as a space backdrop in a Star Trek or Star Wars movie. You want to adjust the brightness dial until the overall image is bright, but the black parts of the image are convincing. In a space backdrop, the darkness of space should be black, but you should still be able to make out the individual stars.
When calibrating the contrast slider, you may want to use a scene that has a sky full of white clouds. You will adjust the contrast slider to the point where the white clouds retain their brilliance, but their detail is seen.
Getting The Sharpest Focus Possible
It can be difficult to properly adjust the focus on your projector if you’re looking at a scene that has landscapes or people. One of the best ways to calibrate the focus of your projector is to get your projector to project words. The end credits of a movie are a great choice because you have white text against a black background.
For the best results, have another person stand by the image that’s being projected to the point where they can see the pixels. Slowly adjust the focus back and forth until the image is as sharp as possible. Your assistant should be able to guide you so that you can adjust the image to the point where the pixels are not blurry. You do not want to overcompensate the focus.
Getting The Best Image By Selecting The Right Position
You can do all of the small tweaks that you want, but if your projector is not in the right position with respects to the screen, your image is going to be distorted. You want your projector to be on a flat surface. Most units are equipped with adjustable feet that allow you to level the projector quickly.
You want your projector to be even with the center of the screen that it is projecting on. If you place your projector too high up or too low down, the image becomes skewed. It starts to look more like a trapezoid than a rectangle.
Most projectors have keystone corrections — these work by stretching out the picture vertically or horizontally. So your image looks perfectly rectangle on the screen, but because parts of it are stretched, there could be noticeable distortion.
Use the zoom feature to enlarge or reduce the size of your image so that it fits the screen. Talking about the screen, if you have the choice of showing your image on a blank wall or on a screen, we recommend that you use a projection screen. These screens are designed to be more reflective. This gives you a sharper and more vibrant picture as opposed to what you would get from a standard wall.
Many projector screens have a black frame around them. This black frame tricks your eyes in a way that makes the images being projected appear to be even more vibrant. Adjusting the brightness, contrast, or zoom will produce minimal effects. However, the difference between having a projector screen and projecting your image on the wall is drastic.
Adjusting The Color On Your Projector
There are a number of factors that come into play when measuring color. Part of it is brightness. This affects the way that your eye perceives the image. The other is luminance, and this is the quality of light that’s produced by the projector.
As your projector begins to deteriorate, it will experience image fading. This will make it difficult for you to distinguish between dark and light pixels within the image. You could also see a blending of yellow and green tints. Blue colors can disappear as they melt into green.
There are some minor adjustments that you can make to correct this. However, when you start to notice coloration issues, this may be an indication that a component of the projector needs to be replaced or that you should replace the projector altogether. The projector is the center of a home theater system. If it produces a clear and crisp image, it makes your viewing experience immersive.
However, if the image produced by your projector is blurry or there are issues with color or contrast, all of these things will pull you out of the experience. We would love to hear from you. What tips or techniques have you used to get the most out of your projector? Tell us about them in the comments section below.
If you are interested in even more technology-related articles and information from us here at Bit Rebels, then we have a lot to choose from.
COMMENTS