Is your iPhone displaying the frustrating “iOS 17 stuck on Update Requested” message? Don’t worry; you are not alone. Many iPhone users encounter this issue when attempting to update their device’s operating system. It can be quite annoying to see your iPhone stuck on the “Update Requested” screen for an extended period, preventing you from accessing your device fully.
In this article, we will explore eleven easy and effective ways to fix the “iOS 17 stuck on Update Requested” problem. Whether you are experiencing this issue on an iPhone or an iPad, these solutions will help you get past the update bottleneck and have your device up and running quickly.
Let’s delve into the various scenarios that could lead to your iPhone is stuck on the update-requested screen, and the corresponding solutions to resolve this frustrating situation. So, if you’re ready to bid farewell to the update woes, let’s get started with these practical troubleshooting methods.

IMAGE: PEXELS
Why Is iOS 17 Stuck On The Update Requested?
There are several reasons why your iOS 17 device might get stuck on the “Update Requested” screen. One common cause is the overwhelming demand on Apple’s servers when a new iOS version is released. As millions of users try to update their devices simultaneously, it can lead to congestion and slow down the update process. Another possible reason could be network issues. Poor or unstable internet connectivity can disrupt the update download, causing the iPhone stuck on the update requested status.
Additionally, insufficient device storage is known to trigger this problem. If your iPhone or iPad doesn’t have enough free space to accommodate the update, it may remain stuck during the installation process. Software glitches or corrupted update files may also be culprits behind the “Update Requested” dilemma.
11 Easy Ways To Fix iOS 17 Stuck On Update Requested?
Dealing with an iPhone stuck on “Update Requested” can be frustrating, but fear not, as there are several simple and effective methods to resolve this issue. Let’s explore eleven easy ways to fix iOS 17 stuck on “Update Requested”:
Learn: How to Fix iPhone Stuck on Update Requested
1. Compulsory Withdrawal Setting Apps
Sometimes, background apps can interfere with the update process. Force quit all running applications before attempting the update to ensure a smooth update. To do this, double-click the Home button (for older iPhones with a Home button) or swipe up from the bottom of the screen (for newer iPhones without a Home button). Swipe left or right to find the app you want to close, and then swipe it up and off the screen.
2. Activate And Deactivate Airplane Mode
Turning on Airplane Mode and then disabling it can help resolve minor connectivity issues that may be hindering the update process. Simply go to Settings, toggle on Airplane Mode, wait for a few seconds, and then turn it off again.
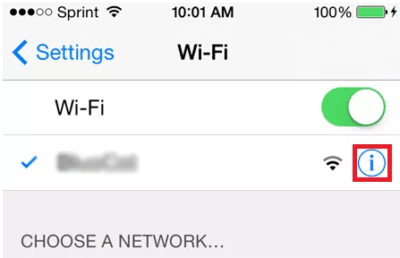
3. Check Your Internet Connection
Ensure that your iPhone is connected to a stable and reliable Wi-Fi network. A poor internet connection can cause the update to stall or fail. Consider switching to a different Wi-Fi network or using cellular data if Wi-Fi is not available.
4. Ensure Adequate Storage
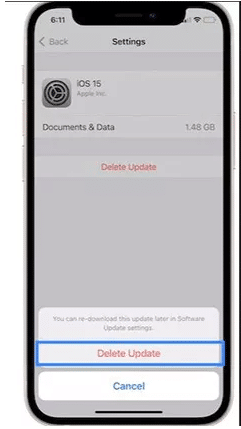
Before attempting to update, verify that your device has enough available storage space. Updates require sufficient free space to download and install successfully. Go to Settings > General > iPhone Storage to check your available storage. If it’s low, consider deleting unnecessary files or apps to free up space.

5. Use Tenorshare ReiBoot Without Data Loss (Quick & 100% Work)
Tenorshare ReiBoot is a leading iOS system repair software with a reputation for effectively resolving various iOS-related issues. Whether you’re facing the “iOS 17 stuck on Update Requested” problem or encountering other system glitches, ReiBoot provides a quick and reliable solution without compromising your precious data.
Key Features of Tenorshare ReiBoot:
- One-Click Repair: ReiBoot simplifies the process of fixing iOS issues by offering a one-click repair solution.
- No Data Loss: Unlike many other repair methods, ReiBoot ensures that your data remains intact throughout the process.
- Fixes Various iOS Issues: ReiBoot is a versatile tool that can tackle an array of iOS problems, such as a device stuck in recovery mode, a black/white screen, a boot loop, and more.
- Compatibility: ReiBoot supports a wide range of iOS devices, including iPhones, iPads, and iPod Touch, running various iOS versions.
Steps to Use Tenorshare ReiBoot:
Step 1: Download Tenorshare ReiBoot – iOS system repair from their official site and Install the software by following the on-screen instructions.
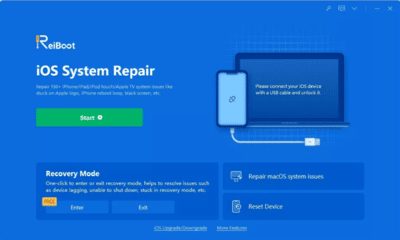
Step 2: Launch Tenorshare ReiBoot on your computer and connect your iPhone to the computer using a lightning cable. Once the software detects your iPhone, click on the “Repair Operating System” option on the main interface.
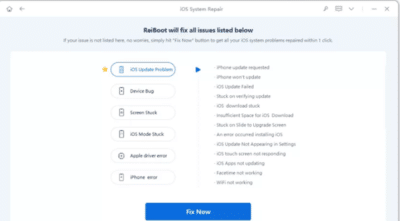
Step 3: In the next window, click on “Fix Now” to initiate the repair process.
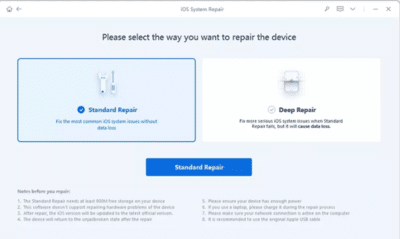
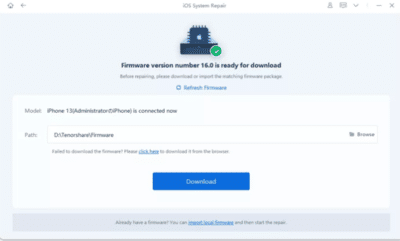
Step 4: Click “Browse” to choose the location where you want to save the firmware package, and then click “Download.”
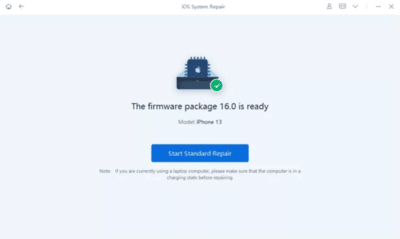
Step 5: Once the firmware package is downloaded, click “Repair Now” to begin the system repair process. ReiBoot will automatically start fixing the iOS system issues that caused your iPhone to be stuck on “Update Requested.”
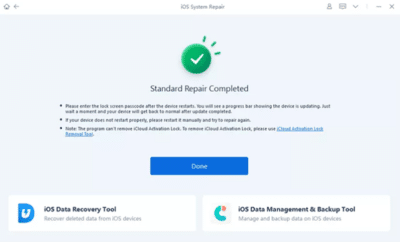
Step 6: After a successful repair, your iPhone will automatically reboot, and the “Update Requested” issue should be resolved. Your device will now run smoothly with the latest iOS version.
Video Tutorial:
For a more visual guide on using Tenorshare ReiBoot, you can watch this video tutorial:
Click here to watch the Tenorshare ReiBoot tutorial video
6. Force Restart Your iPhone
If your iPhone say update requested, a restart may help break the cycle. There are various methods to force restart your iPhone depending on its model:
For iPhone 8 And Later Models:
- Press and let go of the Volume Up button quickly.
- Press and then let go of the Volume Down button quickly.
- Hold down the Side button while pressing it until the Apple logo shows.
For iPhone 7 and 7 Plus:
- Press and continue to hold the Side and Volume Down buttons together until you see the Apple logo on the screen.
7. Put Your iPhone Into Recovery Mode/DFU Mode
If the previous methods haven’t worked, you can try putting your iPhone into Recovery Mode or Device Firmware Update (DFU) Mode. These modes allow you to restore your device using iTunes or Finder. However, keep in mind that this process will erase all data on your iPhone, so make sure to back up your device before attempting this method.
8. Network Settings Reset On iPhone
Resetting network settings can help resolve network-related issues that might be causing the update problem, so go to Settings > General > Reset > Reset Network Settings. Though this will reset all network-related settings, including your cellular settings.
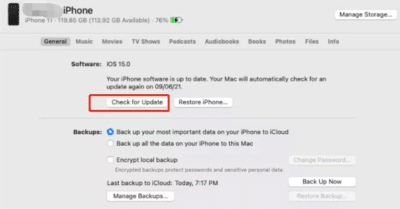
9. Update iOS Version Via iTunes Or Finder (PS: You Also Can Update iOS 17/16 Via Tenorshare ReiBoot)
Upgrade your iOS version using iTunes (for Windows and macOS Mojave or older) or Finder (for macOS Catalina and later) if the over-the-air (OTA) upgrade isn’t functioning. Operate iTunes or Finder, select your iPhone from the list of devices, and select “Check for Update.” Update your iOS version by following the on-screen directions.
10. Check Apple Server Status
At times, the issue may not be with your iPhone but with Apple’s servers. Check Apple’s status page (https://www.apple.com/support/systemstatus/) to see if there are any ongoing issues with their services, particularly related to software updates.
11. Contact Apple Support
It’s advisable to contact Apple Support for specialized assistance if nothing else works. They can provide troubleshooting steps and guide you through more advanced solutions to fix the “iOS 17 stuck on Update Requested” problem.
Conclusion
In conclusion, dealing when your iPhone says Update Requested can be annoying, but with the right approach, you can overcome this issue effortlessly. Throughout this article, we have explored various solutions to fix the “iOS 17 stuck on Update Requested” problem.
While there are multiple methods available, Tenorshare ReiBoot stands out as the optimal choice due to its user-friendly interface, one-click repair, and the assurance of no data loss. Whether you encounter this issue or face any other iOS-related problem, Tenorshare ReiBoot is your go-to tool for quick and reliable solutions.
Hot FAQ
1. Should I Upgrade To iOS 17?
Upgrading to the latest iOS version often brings improved features, enhanced security, and bug fixes. However, before upgrading, ensure that your device is compatible and that you have sufficient storage space. Back up your data to avoid any potential data loss during the update process.
2. How Long Does It Take For An iOS Update Requested?
The time taken for an iOS update requested varies based on factors like internet connection speed, available storage space, and server load. In ideal conditions, the “update requested” phase should take less than 5 minutes. If it exceeds this time significantly, you may encounter the “iPhone update requested” error.
3. What Does “Update Requested” Mean?
“Update Requested” appears on your iPhone when you initiate an iOS update. It indicates that your device has requested the latest iOS version from Apple’s servers, and the download process is about to begin.

COMMENTS