


Building a portable computer around a Raspberry Pi CM5 is not a hobbyist exercise in miniaturization. The real significance here is not simply that a tiny compute module can run a desktop; it is that three domains collide and define whether the whole idea actually works – high-speed signal routing, mechanical balance, and power management.
What becomes obvious when you look closer at this project is that each decision cascades into several others. Pick a heavy, efficient MIPI display and you have to rethink hinge torque and counterweights. Commit to custom carrier routing for PCIe and DSI and you inherit controlled impedance rules that will punish sloppy geometry. Choose a prebuilt UPS module to avoid designing a charger and you trade off how the system wakes and who controls the main rail.
The footage and notes of the build reveal one early, useful insight: this is less about making a smaller laptop and more about composing tolerances. The factors that determine success are mechanical tolerances in the enclosure, electrical tolerances on the board, and thermal headroom for the CM5 under sustained load. Miss one and the device still might boot, but it will be a fragile thing that only works under a narrow set of conditions.
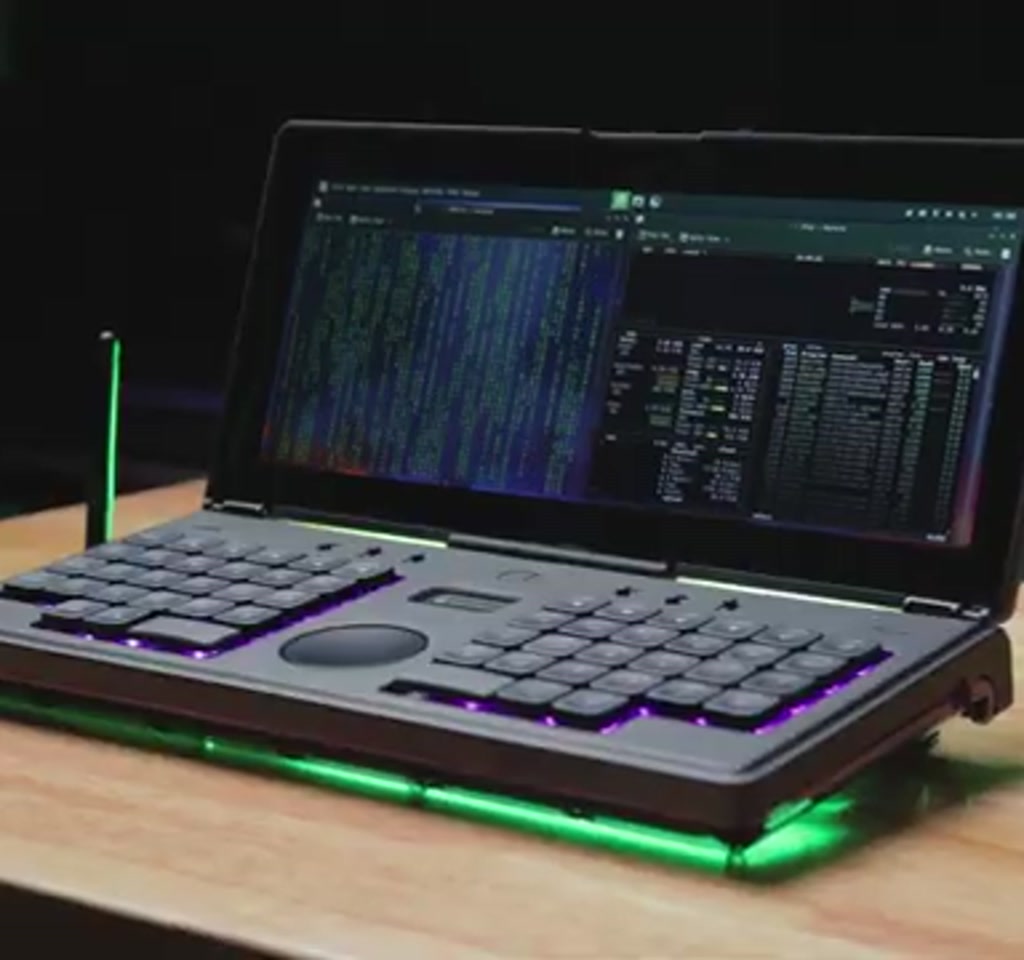
With that framing in place, the project itself maps to a clear sequence of challenges and solutions. The creator used a 12-inch Waveshare IPS MIPI panel with capacitive touch, torque hinges from McMaster-Carr, a custom split ortho low-profile mechanical keyboard driven by an RP2040 on its own PCB, and a CM5 mounted to a custom carrier board that provides NVMe, USB hub, audio, and GPIO. PCBway handled fabrication and some enclosure work for the final parts.
From the build notes you can see the pattern: early choices shape later constraints and the final device is less a collection of parts than a negotiated compromise between signal integrity, mechanical engineering, and power-electronics reality.
Why The CM5 Is An Interesting Starting Point
The Compute Module 5 is a compact system-on-module that exposes raw interfaces and requires a carrier board for I/O. That modularity allows designers to pick exact physical layouts and ports, but it also shifts complexity onto the carrier PCB and the enclosure integration that follows.
Turning a CM5 into a working Raspberry Pi CM5 cyberdeck means designing the carrier with the correct lanes, planes, and connectors while also planning the mechanical stack. The carrier is where high-speed routing, power rails, and user-facing I/O converge into tangible tradeoffs.
High Speed Signals And The Carrier Board
High-speed signals change the game. Differential pairs for PCIe and DSI need controlled impedance, matched geometry, and close attention to reference planes; small routing errors can make peripherals silent or unstable.
Differential Pairs And Controlled Impedance
For this build, the designer used a four-layer PCB stackup, online impedance calculators, and signal integrity checks to set trace widths and spacing. The practical rule was to route critical differential pairs first and leave slower, forgiving nets for later.
PCB Manufacturing Choices And Practical Limits
Controlled impedance routing narrows acceptable manufacturing tolerances and makes revisions costly. The carrier board became highly sensitive to layout changes, so professional board checking and a stable stackup were key to avoiding surprises at the board house.
How The Carrier Board Affects Features Like NVMe And USB
Adding NVMe over PCIe and a routed USB hub on the carrier board delivers performance and flexibility but also raises mechanical and thermal consequences. The board must maintain return path continuity and length matching while fitting into the enclosure envelope.
Mechanical Design, Hinges, And The Weight Problem
Mechanical design begins as a series of conditional bets: the enclosure was modeled from published display dimensions before the panel arrived, and the heavier-than-expected 775-gram screen substantially affected balance and hinge torque.
Design choices produced two linked tradeoffs: placing I/O on the rear cleans the aesthetic but restricts lid travel when cables are attached, and visible hinge channels improve cable routing at the cost of assembly complexity and the need for through screws to avoid stripped mounts.
Assembly, Testing, And The Two Fixes That Matter
Assembly progressed from printed prototypes to production PCBs. Two pragmatic fixes materially changed the outcome: removing a 3 volt backfeed from the display and rerouting the power button to cooperate with the UPS module.
Display Leakage And The 3 Volt Backfeed
The display leaked about 3 volts back into the system through the DSI connection and raised rail voltages in unexpected configurations. Cutting the nonessential 3-volt line stopped the backfeed and restored stable behavior, a reminder that peripherals can source voltage in surprising ways.
UPS Module Behavior And The Power Button Reroute
Using an off-the-shelf UPS module intended for the Pi 5 sped development, but changed control semantics: the module could remove the main rail and prevent the on-device power button from waking the CM5. The practical solution was to cut the trace to the power button and reroute it to the power board so the UPS could accept wake signals.
Thermals, Cooling Choices, And Run Time
Thermal constraints determine sustained performance. The CM5 drew around 500 milliamps in early testing and throttled quickly with a thin CM4 cooler; moving to a thicker CM5-specific cooler and adding a fan improved sustained clocks at the cost of a modified bottom shell and a less flat resting posture.
Battery runtime is bounded by capacity and system load. Two 5000mAh cells in parallel on the UPS module yielded roughly four hours of normal usage in the builder’s tests. Charging used the official 27-watt supply, and the native kernel driver reported battery state and allowed graceful shutdown.
Features, Usability, And The Secret Bench Trick
The finished cyberdeck includes a routed USB hub with downstream ports and a host-facing port that lets the deck lend its keyboard to another machine while remaining powered – provided the deck is already on and still using its main UPS input.
The split ortho keyboard is driven by an RP2040 running QMK-compatible firmware; NVMe runs over PCIe Gen 3 with solid throughput after successful negotiation; audio uses an i2S DAC feeding two amplifiers so a mechanical jack can switch between headphones and speakers.
Practical Usability Notes
The form factor favors productivity over media consumption: the display aspect ratio is better for side-by-side windows than wide video. The low-profile ortholinear layout requires a learning curve, an expected investment for any custom keyboard layout.
CM5 Versus Single-Board Alternatives
Choosing a CM5 carrier approach trades off customization for integration work compared to single-board computers. The CM5 lets you design exact I/O, but that flexibility forces attention to routing, power semantics, and mechanical integration that a ready-made board would absorb for you.
In practice, a CM5 cyberdeck will demand more upfront design and testing than an off-the-shelf SBC laptop conversion. The reward is tighter-fitting features and expandability, at the cost of increased engineering coupling and potential fragility.
What This Project Teaches About Custom Hardware
Two discipline-level lessons stand out. Subsystem choices create hidden coupling across mechanical, electrical, and firmware domains. And using validated modules reduces design effort but often forces small wiring or mechanical adaptations to match user expectations.
Quantitatively, display weight can run into hundreds of grams and require counterweights or larger batteries; thermal headroom requires additional surface area or active cooling for sustained CM5 load; and realistic mobile runtime for a fully featured NVMe-equipped deck usually lands in single-digit hours unless battery capacity scales dramatically.
Who This Is For And Who Should Avoid It
This approach is best for makers who want full control over I/O, layout, and expansion and who can tolerate the extra work of carrier design, controlled impedance routing, and enclosure iteration. It suits projects where customization matters more than time to first working unit.
It is not ideal for those who want a drop-in portable with minimal electrical or mechanical design. If you want a turnkey laptop-style experience or need all-day battery life without bulky cells, consider a different path or expect significant tradeoffs in weight and ergonomics.
Moving Forward: Reducing Coupling Costs
Open questions remain about how to make this class of device easier to iterate. Can modular carrier templates with validated high-speed routing become a commodity? Can power modules expose standardized wake semantics to avoid trace cutting and rerouting? Those are the tensions that will determine whether CM5 portables remain brilliant one-offs or scale into reproducible platforms.
Watching how builders balance these tradeoffs in future projects will reveal which incremental standards and templates actually reduce the coupling costs without introducing new failure modes.
For those who want to inspect exact solutions, the builder published design files and notes on GitHub, enabling reuse of subassemblies like the keyboard PCB, carrier reference, and enclosure patterns as starting points rather than rebuilding from scratch.
FAQ – Frequently Asked Questions
What Is A Raspberry Pi CM5 Cyberdeck? The phrase describes a clamshell portable that uses a Raspberry Pi Compute Module 5 mounted on a custom carrier board, paired with a display, keyboard, batteries, and an enclosure to create a handheld or laptop-style device.
How Does The Carrier Board Handle High Speed Signals? The carrier uses a four-layer stackup, impedance calculations, and signal integrity checks to route differential pairs for PCIe and DSI with matched geometry and controlled impedance to maintain reliable links.
Is NVMe Supported On This CM5 Build? Yes. The design provides NVMe over PCIe Gen 3 on the carrier, and the builder reported solid throughput after the link negotiated at Gen 3.
How Long Does The Battery Last? With two 5000mAh cells in parallel on the UPS module, the build delivered about four hours of normal usage in the monitoring tests reported by the builder.
What Thermal Solutions Were Used? The project moved from a thin CM4 cooler to a thicker CM5-specific cooler and added a fan to improve sustained performance, at the cost of modifying the bottom shell and adding risers for a level resting posture.
Can I Use An Off-The-Shelf UPS Module? The builder used an off-the-shelf UPS module intended for the Pi 5 to avoid designing a charger. That saved development time but required rerouting the power button to allow the module to accept wake signals.
Where Can I Find The Design Files? The builder published the project files and notes in a public repository on GitHub for inspection and reuse.
Does The Display Require Special Handling? Yes. The display leaked a 3-volt backfeed into the system through the DSI connection; removing the nonessential 3-volt line from the CM5 to the display resolved the issue. This shows peripherals can source voltage unexpectedly and may require isolation or power routing work.
COMMENTS