A few weeks ago, I needed to recover files from a formatted USB stick and an old external hard drive that had turned RAW. After reading a few forums and comparison articles, I decided to test Stellar Data Recovery Professional for Windows.

IMAGE: UNSPLASH
Installation And Setup
The software was easy to install. I downloaded the installer from Stellar’s official site and installed it within a couple of minutes. No toolbars, ads, or third-party software were bundled in—which I appreciated.
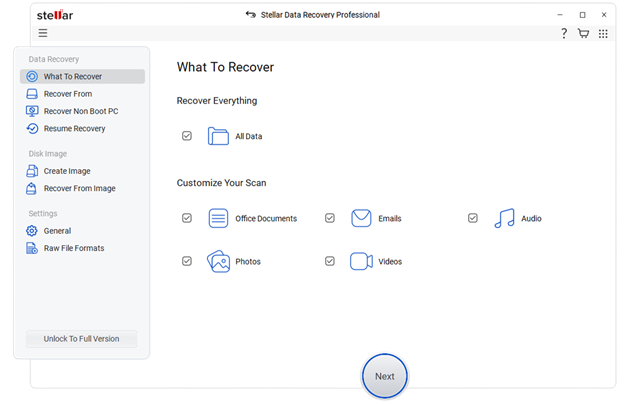
Once launched, the interface of Stellar professional data recovery software was clean. The first screen asked me to select the types of files I wanted to recover—documents, emails, photos, videos, etc. I just selected everything to be safe and moved on.
Recovering Data From A Formatted Usb Drive (detailed Walkthrough)
This was the main reason I downloaded the software. I had accidentally quick-formatted a 16 GB USB stick with some family photos, documents, and a few video files. Here’s the exact process I followed:
This was the main reason I downloaded the software. I had accidentally quick-formatted a 16 GB USB stick with some family photos, documents, and a few video files. Here’s the exact process I followed:
Step 1: Plug In The Drive And Launch The Software
After plugging in the USB, the software detected it under the “Connected Drives” section.
Step 2: Select File Types
I chose to recover:
- Photos
- Documents
- Videos
I skipped emails and audio since those weren’t relevant to what had been stored on that USB.
Step 3: Select The Formatted USB Drive
I selected the USB stick from the list of available drives. It was listed by its drive letter (E: in my case), along with its capacity and file system. Since it had been formatted, there were no existing files visible in File Explorer, but Stellar still recognized it.
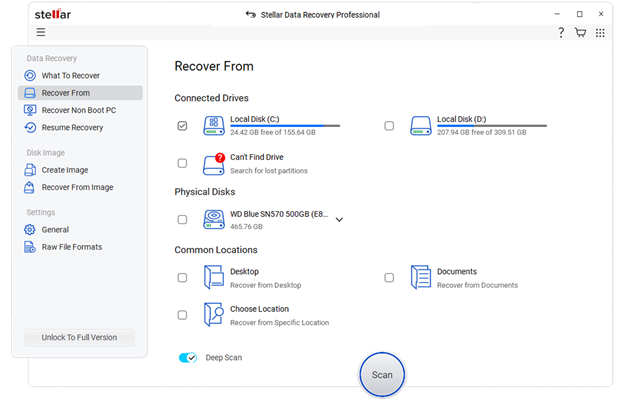
Step 4: Start With A Quick Scan (Optional)
I tried a Quick Scan first. It found a handful of files, mostly from recent use before the format. The structure seemed a bit off, and I wasn’t able to preview many of the files I was hoping to recover—so I moved on.
Step 5: Run A Deep Scan
From the scan results window, there was an option to run a Deep Scan, which I selected. This process took around 40–45 minutes for a 16 GB drive. It scanned each sector and rebuilt file headers based on type, not just filenames.
Step 6: Browse And Preview Recovered Files
After the deep scan, I got two viewing options:
- Tree View (shows folders)
- File Type View (groups by extension like .jpg, .docx, .mp4, etc.)
I used File Type View, which grouped all the JPEGs together. I could preview almost all of the photos before recovery, which helped confirm they weren’t corrupted.
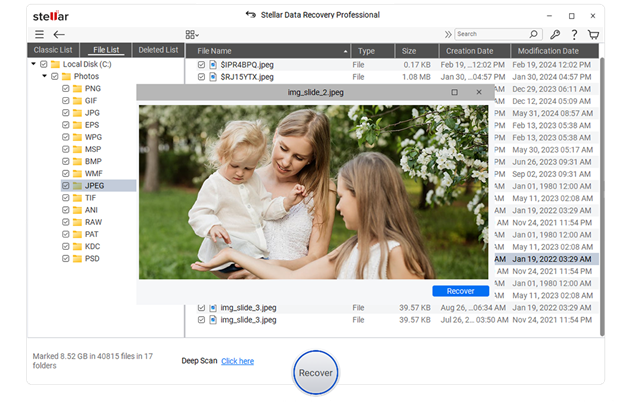
Step 7: Recover And Save
I selected everything I wanted and clicked the Recover button. It asked me to choose a different location to save the files to (it won’t let you recover back to the same drive to avoid overwriting). I used a separate external HDD.
All in all, the recovery was solid. About 95% of the photos and documents came back usable. Some older video clips were corrupted, but I’m not sure if that’s due to the format or earlier drive wear.
Recovering From A Non-Bootable System
I also tested this using a spare laptop where I simulated a Windows crash. I created a bootable USB recovery media using Stellar’s built-in tool. The steps:
- Launched Stellar and went to “Create Recovery Drive.”
- Chose a blank USB stick.
- The software created a bootable image and copied it.
- I booted the laptop from the USB and used Stellar’s interface to access the internal disk.
Even though Windows wouldn’t load, I was able to recover files directly from the system partition. This feature alone makes the software worth keeping around if you’re the go-to tech support for friends and family.
Pricing
I used the Professional edition, which costs $89.99 per year. This version includes all the main recovery features like deleted file recovery, formatted drive support, lost partition recovery, and the ability to create a bootable recovery USB for non-booting systems.
If you’re dealing with more advanced needs—like corrupted videos or photos—you might want the Premium version, which adds file repair tools and is priced at $99.99 per year.
Performance And Stability
- Quick scans: Took under 5 minutes for most drives.
- Deep scans: Slower but very thorough.
- Crashes or bugs: None during my testing.
The software did what it promised without system slowdowns or weird behavior. I used it on Windows 11 with no compatibility issues.
Pros
- Very easy to use, even for beginners.
- Recovers from a wide range of data loss scenarios.
- Deep Scan is thorough and recovers even older deleted files.
- Supports encrypted (BitLocker) drives.
- Bootable media recovery is excellent for non-booting PCs.
- Previews most files before recovery.
Cons
- Deep scans can take a long time on large drives.
- Free version is limited to 1 GB (not useful for big jobs).
Final Thoughts
If you’re looking for reliable data recovery software that goes beyond just undeleting files, Stellar Data Recovery Professional is a solid option. I used it for recovering from a formatted USB drive, a RAW disk, and a crashed system—all with successful results.
While it’s not cheap, the time and files it helped me recover were well worth the cost.

COMMENTS